Cheese Making 101

Learn how to make cheese from fresh milk at home.

Cheese Making 101

Another comprehensive guide by MFRE


Cheese making is an incredibly technical art that dates back to ancient times. There are however, plenty of cheeses that are well suited for the novice, & one may very well decide to pursue the art & science once they get started. Fresh cheese can be made in a matter of a couple hours, while some cheeses are made over a period of years. Learning the art of making & aging hard cheeses could be a lifelong endeavor, but we can teach you to make quality cheese right off the bat with some relatively simple recipes.

First let’s go over some of the science behind the art.
Traditionally, cheese has been defined by the use of rennin (commercially sold by the trade name Rennet) to induce coagulation. Rennin (also known as chymosin) is a protein-digesting enzyme derived from the inner lining of the fourth stomach of cud-chewing, nursing mammals. When a young animal consumes milk from its mother, the milk is coagulated inside the animal’s stomach to aid in digestion and retention of nutrients. Humans have harvested and utilized the coagulation properties of this stomach lining for eons & have even developed a similar “Rennet” derived from vegetable sources.
Other cheeses that don’t technically meet the criteria defined by the use of rennin are lactic cheeses, & acetic acid coagulated cheeses. These types of cheese are generally quicker to make and less labor intensive than cheeses coagulated with rennin. We will give a recipe that suits our liking for all three types.

Acetic Acid Coagulated Cheese
Caso Blanco (white cheese)

Caso blanco is a cheese coagulated with vinegar that originated in Mexico. This cheese is the quickest to make & is made from fresh milk. It has relatively no flavor yet imparts a mildly sweet taste, & it will never melt. These qualities are enough to make some turn their cheek, but keep reading because there are some specialty uses that embrace these qualities. The fact that the cheese has relatively no flavor coupled with the fact that the cheese is quite dry means that it readily absorbs the flavors of whatever it comes in contact with. Since it will not melt, it is great for cooking. Broken into nickel size chunks & used in a stir fry, the cheese takes on all the flavors of the vegetables and meat. Stuffed into jalapenos and grilled or fried, the cheese will not run out and again absorbs the flavors from the pepper and/or bacon. 
Here’s how it’s made.

thermometer in milk

Getting Started

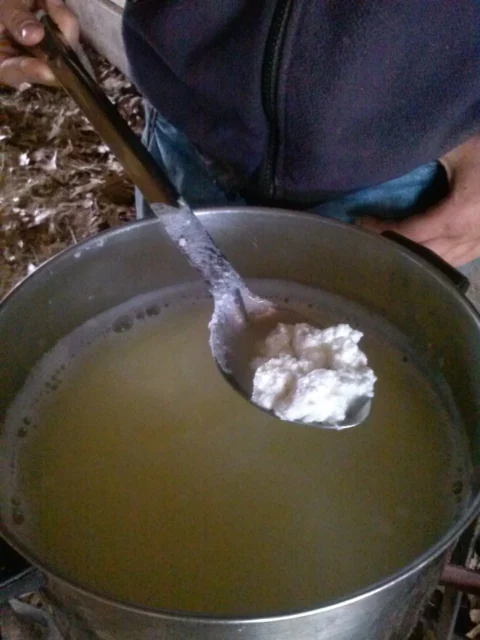
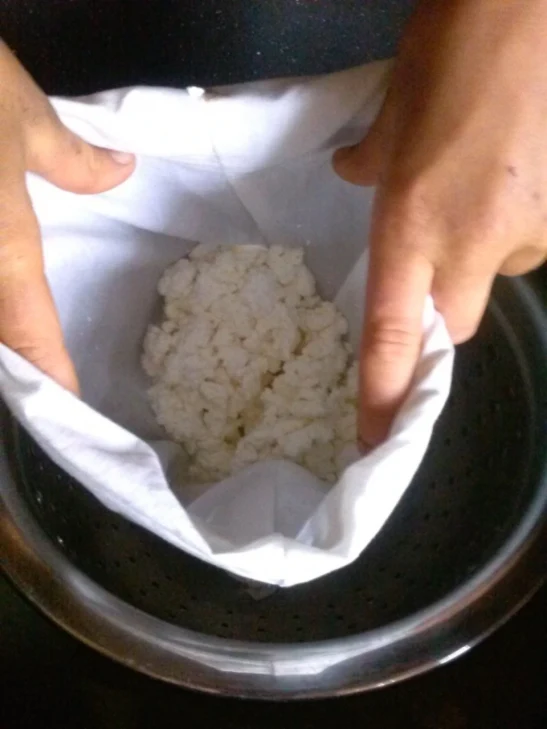
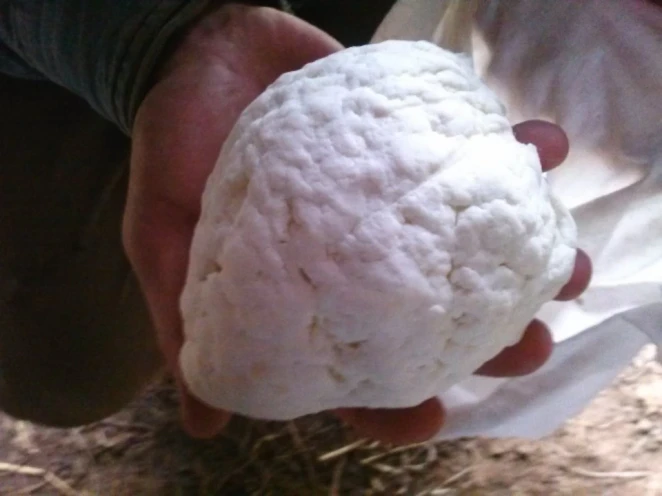
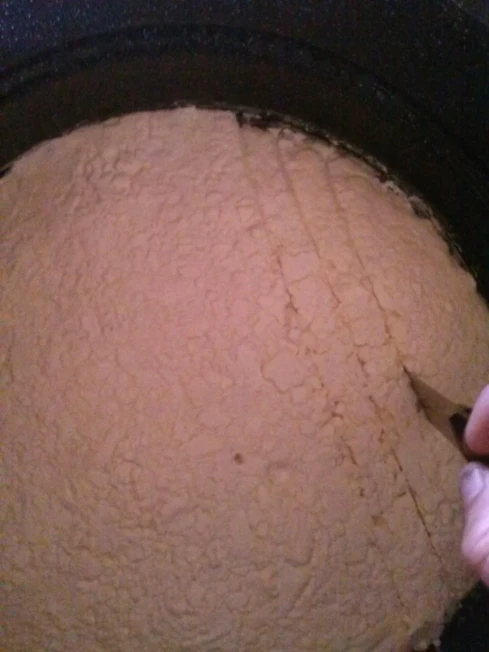
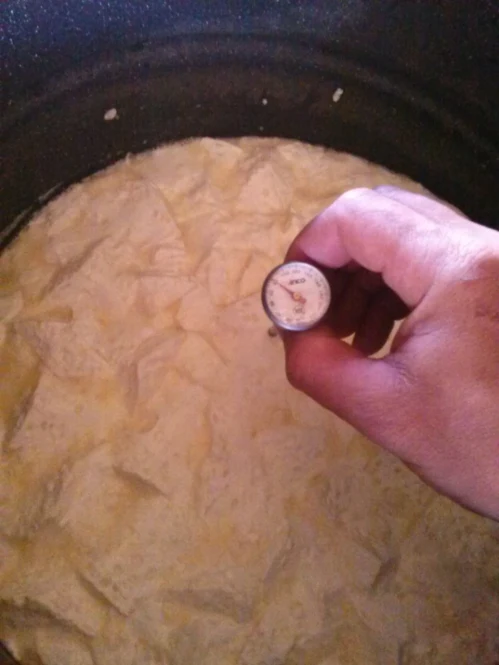
This is the only cheese we know of that calls for directly heating the milk without a double boiler. Heat milk in a thick bottom pot, or a pot set atop a diffuser. Do not heat it quickly, but rather bring the temperature up at a rate of about two degrees every five minutes. Stir the milk constantly as the temperature rises. Bring the milk up to 180° and hold it there for several minutes.

vinegar in measuring cup

Use vinegar to coagulate the milk.

Slowly add ¼ cup of quality vinegar for each gallon of milk and remove from heat. The milk will coagulate within the next few minutes.

curds in spoon

Separate the curd from the whey.

Pour off the whey through a muslin lined colander. Reserve the whey for baking or if you have a hog to feed.

curds in cheese cloth

Drain the curd.

Allow the curd to drain, and then remove it from the colander by picking up the muslin. Ring out the ball of curd by twisting it up in the muslin.

ball of cheese

You just made caso blanco!

This is the resulting ball of cheese coagulated from one gallon of milk. The acid coagulation method renders the highest yield by far. The cheese is ready to eat immediately, and will store in a cold room for a week or two. Freeze it for long term storage.

Lactic Cheese

Lactic cheese is relatively mild in flavor. Milk is coagulated by lactic acid during the natural ripening of the milk. This will not work with pasteurized milk. This process takes anywhere from three days to over a week in some cases. Environmental conditions will dictate the speed of the process.
In a double boiler, bring the temperature of the milk up to 90°F slowly (2° every five minutes). Set the whole double boiler, water and all, in a very safe location. 
Over the next few days the milk will coagulate. Test to see if the curd is ready by inserting a thermometer or a clean finger all the way through the curd. If the thermometer or your finger comes out clean, the curd is ready. If it does not come out clean, leave it longer.

cutting the curd

Cutting the curd.

When the curd is ready, its time to cut it. Cut the curd into strips about ½” wide or a little wider. Cross cut the curd and stir it into the whey.

thermometer in pot with curds

Heat the curds & whey.

Place the double boiler over heat and slowly bring the temperature up to 140°F stirring frequently. Cook the curd until a sample that is bit in half with your teeth is “squeaky”. You will know what we mean by squeaky once you have completed the first batch.

pouring curds into cheesecloth

Separate curds from whey.

Strain off the whey by pouring it through a muslin lined colander. Twist up the muslin tightly and squeeze any remaining whey out.

weight on makeshift cheese press

Mould cheese under pressure.

If you have a cheese press, use it. If not then it’s time to get creative. Mould the cheese under as much pressure as possible. In the above picture, the drained curd still in the muslin has been placed in the bottom of the double boiler. Seven gallons of water placed on top is providing pressure to the makeshift press. Leave the cheese in the press for a few hours or overnight.

wheel of cheese on cutting board

You just made a wheel of cheese!

The result is a wheel of cheese. It has a consistency similar to store bought mozzarella, and a mild but pleasing flavor.
Caso fresca “cold cheese” is made in the same fashion with only one difference. The curd is crumbled between ones fingers before it is put in the press. Caso fresca is a Mexican cheese that is both dry and crumbly.
Both variations of lactic cheese will last a week or so in a cold room.

Hard Pressed Cheese

Rennet (rennin, chymosin) can be purchased online in a multitude of forms. Most commonly, a pill about the size of a multi vitamin that is derived either from animal or vegetable sources. Liquid forms are also available. Now that fits the bill for most, but we prefer to do things the hard way. Harvesting one’s own rennin is a time lost process so we feel the need for a revival. Here it is.


Harvesting Rennin
First things first, you will have to kill a juvenile cud chewing animal at such an age that it is still nursing. The animal should be only a couple days old at the time of slaughter. A goat kid, lamb, fawn, pig, or calf will do, just to name a few. On a farm it is fairly common to lose animals soon after birth, & these animals make prime candidates for selection. 


Remove the stomach from the animal during slaughter and wash it thoroughly. 


Method #1: Soak the washed stomach in a salt saturation (as much salt as will dissolve in a given amount of water) for five days at room temperature. Remove the stomach from the brine and allow it to drain. Lay it out on a board and salt it very liberally. Use a rolling pin to work the salt in on both sides. Roll the salted stomach up like a scroll, and hang it out to dry. Later, when making a batch of cheese, just cut off a suitable size piece, soak it in water for 30 minutes, and rinse it off for use.

Method #2: Cut the stomach into 3/4 inch squares and pack them in a jar with lots of salt.

Regardless which method was used to dry and store the stomach, it is imperative that it be stored for a minimum of one year before proceeding to the next step.

After a minimum of one year curing, place the stomach in a suitable container and add ½ gallon of water (or whey). Leave this at room temperature for three days and strain, reserving the water (or whey). The result is liquid rennin. A tablespoon per gallon of milk should coagulate nicely, but you may need to experiment a little. Once one batch of cheese has been made, the whey from that batch will work to coagulate the next one. Use ¼ cup of whey for five gallons of milk. 

putting curds in cheese press

Fill the press with curds.

Line the press with cheese cloth. This needs to be four plies thick so double it up, as it comes as two plies to start with. Transfer the curd to the press using a spoon with holes. Fill the press to ½ inch below the top of the mould. 

curds in cheese press

Pack the curds down in the press.

Pack the curd down with the back of the spoon slowly so the whey has time to escape through the weep holes in the mould. Add curd if necessary up to ½ inch below the top. 

cloth wrapped curds in cheese press

Fold the cloth neatly.

Fold the cheese cloth over the top of the curd nice and neat.

putting top plate plunger on top of cheese in press

Almost ready to press.

Place the plunger on the top of the mould.

tightening cheese press

Time to press your cheese.

Begin the process of pressing. This will be a somewhat slow process. Apply as much pressure as necessary to get whey dripping out of the weep holes, and no more. Allow the press to sit idle, making no adjustment until it stops dripping whey. Apply pressure periodically through the course of 24 hours or more. It is time to stop increasing pressure when the amount of effort required to do so stops changing. Allow the press to rest under full pressure for 12 hours.

removing cheese from press

Remove cheese from press.

Remove the cheese wheel from the press carefully so as not to break it. If all went well during the pressing process, the cheese wheel should have shrunken and should come out of the press relatively easily. It will likely be stuck to the plunger making it quite simple to remove from the mould.

hard cheese wrapped

Looks like cheese!

Remove the plunger from the cheese wheel carefully.

bees wax in jar inside pot of boiling water

Melt some beeswax. 

Now it’s time to wax the cheese wheel. We use beeswax harvested from the hives throughout the season. The wax must be heated to melting point in a double boiler (or makeshift one) to avoid reaching its smoke point.

waxing wheel of cheese

Waxing your cheese wheel.

Once the wax has melted, use a natural bristled brush to paint it on the cheese wheel. It will take many coats to reach an acceptable thickness. About 1/8” thick is sufficient. 

painting wax on cheese wheel

Paint it on thick.

Pay close attention to the edges, as they usually have some texture which needs to be filled with wax. Air bubbles like to form here, and need to be prevented. 

prying waxed cheese wheel from plate

Pry the waxed cheese wheel from the plate.

Use a popsicle stick or something similar to carefully remove the cheese wheel from the plate.

flipping cheese wheel to wax the other side

Time to wax the other side.

Be careful not to peel the wax off the edge of the cheese wheel. Flip the cheese wheel over and repeat the process on the other side.

moulding the corners

Use your fingers to round off the edges.

Round off the edge by pressing slightly with your fingers while the wax is still warm.

waxed cheese wheel on plate

Let it cool.

Allow the wax to cool naturally.

waxed cheese wheel cut in half

You did it!

The finished product should be stored in a cool place (around 50° F). Cheese wheels are stored in a “cheese cave” traditionally. A cheese cave is nothing more than a dark place that is of optimal temperature and humidity. It can be as simple as a wooden box in a cellar, but in all reality, your imagination is the limit. There are many ways to store cheese effectively.


Mississippi Foundation for Renewable Energy & BackwoodsEnergy.org will not be held responsible for any mishaps incurred as a result of YOUR application of any instruction provided in this document. We strive to provide accurate, helpful information through our tutorials, ebooks, & printed documents, but cannot account for the way said information is applied. Please follow all standard safety precautions & be responsible. All information conveyed in any of our publications is to be applied “AT YOUR OWN RISK & DISCRETION”. Please be careful.

Digital Downloads


A link & password will be emailed to you, usually within 24 hours.
Please contact us via email if the link has not been received within 24 hours.
making acorn flour
Acorn Flour
PDF with hi-res color photos

Learn how to make delicious, healthy acorn flour just as many early cultures did long ago. All you need is an oak tree of any variety to collect acorns from. Acorn flour imparts an earthy, organic flavor to bread, pastries, or any dish that regular flour is normally used for. From acorn dumplings to pie crust & loafs of bread, baking with acorn flour sets the stage for a truly natural, superb culinary experience. This is an activity for the whole family to do around the camp fire, or by yourself for a fun adventure.
$2.99

aquaponics system
Aquaponics
PDF with hi-res color photos

Get a comprehensive lesson in biology that will open doors to countless other areas of scientific study. Learn all about the complex chemistry that allows both plants & fish to thrive in a shared environment. Aquaponics is a hybrid farming technique that combines hydroponic growing of edible plants, with aquaculture by raising fish in a symbiotic condition. Produce your own health conscience meat & vegetables in an area as small as a big city apartment balcony!
$9.99

assorted beer in glasses
Beer
PDF with hi-res color photos

If you enjoy beer for more than just the buzz, making your own is quite a fulfilling hobby. If your interest is all about the buzz, you can have fun playing with the alcohol content while still maintaining an acceptable flavor. Grow your own hops (available on this site), & make beer with a unique "homebrew" flavor that can come only from something you did all by yourself. From connoisseur to novice, brewing your own beer is bound to spark a feeling of joy unrivaled by commercial products.

black powder
Black Powder (pyrotechnics)
PDF with hi-res color photos

Physics & chemistry come together in an explosive way. This tutorial will introduce you to pyrotechnics in a truly backwoods manner. Learn to make black powder for use in muzzleloaders & fireworks. Build a simple model rocket engine from every day materials, or a road flare for emergency situations. The amount of information provided in this tutorial will blow your mind. We sure had a blast!

homemade butter
Butter
PDF with hi-res color photos

Whip up a batch of fresh butter in a jiffy. Multiple methods of producing butter at home are described in detail. With fresh milk, butter can be made in a vessel as simple as a canning or pickle jar. From churns to mixers, anyone can make fresh homemade butter with items you likely have at home already. This tutorial is a must for anyone who plans to milk a cow or goat.
$2.99

grinding meat by hand
Canning Meat
PDF with hi-res color photos

Roast, ground meat, fish, sausage links, bacon, chorizo, pepperoni & many more cuts of meat can be preserved for years by pressure canning, while still retaining all flavor & nutrients. This tutorial provides safe methods for pressure canning meats of all kinds. Canned meats are highly convenient for a quick, nutrient packed meal with no need for refrigeration (thus saving a lot of energy). Fill your pantry with more than just canned vegetables by learning the dying art of canning freshly harvested meat.

pressure canned carrots
Canning Fruits, Berries, & Vegetables
PDF with hi-res color photos

Preserve the gardens bounty, make delicious jam without the use of preservatives, & save the seasons fruit harvest by following the easy instructions in this tutorial. 
12.99

making cheese
Cheese
PDF with hi-res color photos

Learn to make all types of cheese from fresh milk. From cottage cheese to hard cheese, this tutorial will guide you down the path to perfection. Make cheese that can't melt for use in stir fry & baked or smoked foods. Build a hard cheese press from scratch, & much more.

homemade mustard in jars
Condiments
PDF with hi-res color photos

Making your own condiments is kind of the apex of self sufficiency, especially if you grow & produce your own ingredients. Learn to make mustard from home grown mustard seeds, turn your extra tomatoes into delectable ketchup & barbeque sauce, or delight your taste buds with mayonnaise made from your own eggs.

cured sausage
Processing & Curing Meats
PDF with hi-res color photos

Cure meat the old fashioned way, without the use (or need for) artificial preservatives. From wet brine to dry curing & smoking, this tutorial contains many years of acquired knowledge in one condensed, easy to read document.
$9.99

distilling
Distilling
PDF with hi-res color photos

Come along on a trip to Missouri to learn the art of distilling high quality alcohol. Made from grains, berries, fruits, honey, potatoes or many other fermentable things found in nature, alcohol is a commodity that has far more uses than simply consuming. Power your garden tiller from distilled corn mash, fuel a cook stove, extract essential oils, or just get drunk. Just about everyone has a significant use for distilled alcohol even if they don't realize it.

rinsing fresh hominy
Hominy
PDF with hi-res color photos

Hominy made the real old fashioned way. All you need is hardwood ashes, corn, & this tutorial. Make a large batch of hominy & pressure can it for future consumption. Homemade hominy is just plain unbeatable when it comes to flavor & consistency. WARNING: You will never eat store bought hominy again.
$2.99

sifting hardwood ashes
Lye Soap
PDF with hi-res color photos

Commercial cleansing products sold today which we call soap, are actually detergents. Detergents are harsh & may be harmful to the skin, especially if your skin is sensitive. Learn to make real soap by the process of saponification. All that is needed is some hardwood ashes, & meat fat or vegetable oil. This is a detailed instruction on the process of extracting lye from hardwood ash, as well as making naturally scented bar soap.
$3.99

young ox with single yoke
Oxen
PDF with hi-res color photos

Over the years, draft power (animal driven) has all but disappeared in the public eye, but can actually be a viable alternative to tractor power for the homesteader. Follow one families adventure into ox power. Learn to fabricate a yoke & other necessary gear from easy to come by materials, & train a weanling steer to pull a plow, cart, or any other implement.

homemade peanut butter
Peanut Butter
PDF with hi-res color photos

If you live in an area where you can grow peanuts or purchase raw peanuts, you are in for a treat. Making peanut butter at home will provide you with an entirely unique, divine culinary experience. Commercial peanut butter is kind of generic & bland, but the real thing is a far cry from that. The smooth yet grainy texture just screams natural, & the flavor is like an explosion of earthy goodness. All tools necessary are likely in your kitchen already.
$1.99

pickled green tomato slices
Pickling
PDF with hi-res color photos

Pickling made easy. Just about any vegetable can be pickled. Minimal standard household kitchen utensils are necessary to transform your garden produce into tasty pickles that will last until the next harvest season.
$1.99

homemade tamales
Tamales
PDF with hi-res color photos

Meat, cheese, or even vegetables can be used to make excellent Mexican tamales. A basic kitchen (indoor or outdoor) has everything necessary. Unless you live in Mexico, "real" tamales are impossible to come by. By making your own, you can make them as authentic as you want, or get wild & experiment with different ingredients. Learn to steam tamales on a camp fire, or in an indoor kitchen.

vinegar
Vinegar
PDF with hi-res color photos

Grow your own "mother of vinegar", which will provide a source of vinegar for as long as it is maintained by feeding alcohol. Vinegar is used in so many ways. From food, to cleaner & even a natural herbicide, vinegar has been used by man for eons. For health conscience folks & connoisseurs of fine food alike, making your own vinegar is definitely a venture worth the minimal effort. Give it a try.
$1.99

wine barrels
Wine Making
PDF with hi-res color photos

Become an amateur vintner in no time. Winemaking is an art that has captured the hearts of individuals from every continent, every race, every background, & in every era recorded in history. Learn all about the chemistry involved (it might even spark a new interest in chemistry), & embark upon an incredible adventure that is certain to be fulfilling.
$10.99

Trending

Newly added digital downloads.
bee keeper
Bee Keeping
PDF with hi-res color photos

An introduction to backyard beekeeping, & an adventure into the wonderful world of entomology. Set up your own apiary & harvest fresh, clean, healthy, super local honey. Beekeeping is an excellent hobby to involve the kids in. Learn everything from the complex behavioral patterns of bees, to the rapid seasonal changes of the flowering plants from which bees harvest nectar & pollen.

making charcoal
Charcoal Manufacture
PDF with hi-res color photos

Using common materials, learn to make superior quality charcoal at home. If you make black powder, this is a must due to the necessity for extreme high quality. Turn red wine vinegar clear with a pinch of bone charcoal, or make "bone black", the worlds darkest black artist paint. Discover the incredible science & art involved in the manufacture of something most would take for granted.

wood fired hot water heater thermosiphon
Hot Water
PDF with hi-res color photos

Build a wood fired hot water heater/boiler  that requires no electricity. Hot showers & dish water are extremely important commodities in a remote location, & this heater design fits the bill just perfectly. Also use as a boiler for hydronic radiant heating in a home or greenhouse. Detailed instruction as well as a conceptual tutorial on the dynamics of thermosiphons.

casting lead on camp fire
Lead Casting
PDF with hi-res color photos

Cast your own fishing weights, jig & spinner bodies, & bullets with minimal equipment. Embark upon a journey into metallurgy. Use foam to sculpt any object you wish to cast, & cast it in sifted ashes from the fire. Recycle used wheel weights or battery cores & turn them into new, useful products.

smokehouse in woods
Smokehouse
PDF with hi-res color photos

Build a cold smokehouse to preserve the seasons bounty. Learn the "old" art of smoke curing & the design concepts of a cold smokehouse.

Our Mission

"Mississippi Foundation for Renewable Energy's mission is to promote sustainable lifestyles. We accomplish this by providing informative assistance in the form of consultation, as well as providing a unique product line geared toward homesteaders & "big city" dwellers alike. We are world leaders in off-grid renewable energy & alternative communications system design. We support the preservation of natural, non-GMO, open pollinated plant life, & donate tens of thousands of seeds each year to seed library programs across the USA. All proceeds from our website https://www.backwoodsenergy.org are utilized in our effort to fulfil our mission of promoting sustainable lifestyles worldwide." 

Days Until Spring (vernal equinox)

Help us spread sustainability
Share this Page!

Contact us

Our customer support team is here to help you.

Email

We will reply as soon as possible.

Phone

We work hard & can't always get to the phone, so leave us a message & we will call back as soon as possible.